Monday, December 31, 2012

Pogo game asking to install java every time - Windows 8

Pogo game asking to install java every time - Windows 8

1. Remove all Java versions

2. Reset IE settings

3. Install Java Version 6.38 here: http://www.java.com/en/download/manual_v6.jsp

   - There are some compatibility issue with pogo games and IE10

4. Install/Use Google Chrome or Firefox
   - From experience Chome and Java 6.38 on Windows 8 will play any pogo games

5. You might need to install "J2SE Development Kit
   - at least this version or higher

http://www.oracle.com/technetwork/java/javasebusiness/downloads/java-archive-downloads-javase5-419410.html


Source:

  1.  http://forums.pogo.com/viewtopic.php?f=155&t=66627
  2. http://www.java.com/en/download/manual_v6.jsp
  3. http://www.oracle.com/technetwork/java/javasebusiness/downloads/java-archive-downloads-javase5-419410.html


Monday, December 3, 2012

Outlook 2007 error message: "the messaging interface has returned an unknown error. if the problem persists, restart outlook."

When outlook 2007 was opened this message would appear: "the messaging interface has returned an unknown error. if the problem persists, restart outlook."


Issue was resolved by:

1. Control Panel > programs and features

2. Select MS Office version that has outlook installed on your PC

3. Select change 

4. Select repair

5. Reboot PC


If that doesn't fix it, try using scanpst.exe located at:


<disk drive>\Program Files\Microsoft Office\OFFICE12
or
<disk drive>\Program Files\Microsoft Office\Office14
or
<disk drive>\Program Files\Microsoft Office(x86)\Office14


source:

  1. http://office.microsoft.com/en-us/outlook-help/repair-outlook-data-files-pst-and-ost-HA010075831.aspx
  2. http://support.microsoft.com/kb/27222

Sunday, November 25, 2012

How To Boot Into Safe Mode On Windows 8

How To Boot Into Safe Mode On Windows 8 (The Easy Way)


image
Once of the most common steps when troubleshooting a PC is to boot into safe mode. For a long time this has been achieved by pressing the F8 key, this all changes with Windows 8 and its Automatic Repair mode. But what if we want Safe Mode?
You can still have Safe Mode, however, it is buried deep into the recovery options of Windows 8. While just mashing the F8 key as we all know will boot you into automatic recovery mode, you can still manually access the recovery options by pressing the Shift+F8 key combination.

Booting Into Safe Mode on Windows 8

The trick is to hold the Shift button and mash the F8 key, this will sometimes boot you into the new advanced “recovery mode”,  where you can choose to see advanced repair options.
You will need to click on the Troubleshoot option.
No select Advanced Options.
Now choose the Windows Startup Settings option, by the looks of things we were never meant to find Safe Mode.
Finally hit the Restart button.
Like magic, when your PC reboots you will be able to boot into Safe Mode from the familiar looking Advanced Boot Options screen.

Getting To Safe Mode From Within Windows 8

You have a second option, however, this requires you to be booted into Windows already. Press the Win+R key combination and type msconfig in the run box and hit enter.
Switch over to the boot tab, and click on the Safe Boot check box.
You can also choose the type of Safe Mode you want to boot into:
  • Minimal is normal safe mode.
  • Alternate Shell is safe mode with command prompt
  • Network is safe mode with networking.
The Active Directory option pertains to restoring a server that is a Domain Controller for your network. Once you have chosen your option click the ok button and restart your machine.
You PC will be booted into Safe Mode automatically.
If you restart you PC you will just keep getting booted into Safe Mode, to stop this open msconfig again and uncheck the Safe Boot option, then hit the ok button.
Finally Restart your Machine.
That’s all there is to it.

source: http://www.howtogeek.com/107511/how-to-boot-into-safe-mode-on-windows-8-the-easy-way/

Sunday, November 11, 2012

Tuesday, October 30, 2012

Google Chrome and Google Drive error "google update installation failed with error 0x8004071b"

Google Chrome and Google Drive error " google update installation failed with error 0x8004071b "

1. For Chrome issue use stand alone .exe located here:

https://www.google.com/intl/en/chrome/browser/eula.html?system=true&standalone=1


2. For Google Drive issue use the link below and replace the "X" with the latest Google drive version:

http://dl.google.com/drive/x/gsync.msi


Example:

as of 10/30/2012 the latest Google Drive version is 1.5.3449.3345, therefore the link you would download the .exe file would be the following:

http://dl.google.com/drive/1.5.3449.3345/gsync.msi


Thursday, October 11, 2012

norton "one click support" error: 5013,3

The error number 5013,3 indicates that the Base Filtering Engine is missing.

First check services.msc and see if your Base Filtering Engine is there.

If it is not there do the following:


1. Save the attached file to your Desktop and rename it as BFE.reg (base filtering engine) - click here to download
2. Doublick the BFE.reg file
3. Accept the Prompts
4. Open Run(Win key + r)->Type regedit
5. Goto HKEY_LOCAL_MACHINE --> SYSTEM --> CurrentControlSet --> services --> BFE
6. Right click on the BFE select Permissions-> Add --> Advanced --> Find now
7. Among the list select Everyone. (Check the below image for reference)

BFE.png

8. OK --> OK --> Put a check mark next to Full Control --> OK

BFE2.png
9. Restart the Computer 


Sources:

  1. http://community.norton.com/t5/Norton-360/Error-5013-3/m-p/613244/highlight/true#M62348
  2. https://skydrive.live.com/?cid=DDCCE2A7666EA200&id=DDCCE2A7666EA200%21130

Wednesday, October 10, 2012

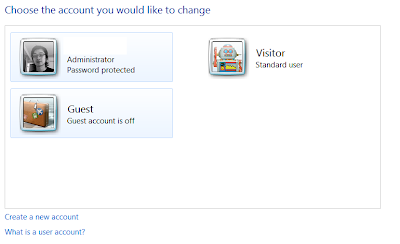
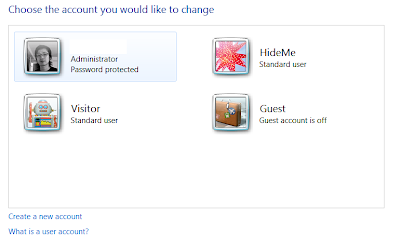
Windows 7 / Vista / XP – Hide User Account from Welcome screen / Login screen


1. Run The Registry Editor in Windows XP/Vista/Win7 by going to Start Menu > Run or by hitting theStart Menu Key + key> type: regedit and hit enter. You will need to run this from an account that has Administrative rights.
2. In the Registry Editor window, go to:
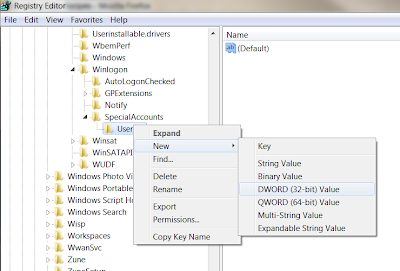
HKEY_Local_Machine\SOFTWARE\Microsoft\Windows NT\CurrentVersion\Winlogon\SpecialAccounts\UserList
3. Right-click on the UserList folder on the left pane and choose New > DWORD (32-bit) Value

Use the username of the account you want to hide as the value and hit OK. It will show up in the right-pane. Exit the Registry Editor
Voila, your account should no longer show up on the Welcome / Login screen or in the Control Panel > User Accounts area.

To unhide the account, just go back to the same registry entry/location and delete the key with the name of the account.

Tuesday, October 9, 2012

Outlook 2010 email account sending double emails automatically


1. Account Settings

2. Email Tab

3. More settings

4. Sent Items tab

5. Select "save sent items in sent folder on this computer"

6. Click OK

7. problem fixed


source: http://social.technet.microsoft.com/Forums/en/outlook/thread/8378baff-8c5a-47bc-90a6-8f9c61b2b394

Monday, October 1, 2012

Quickbooks - Questions page called "Live Community" opening up when you start Quickbooks

Questions page called "Live Community" opening up when you start Quickbooks


1. Edit

2. Preferences

3. Desktop View (left column)

4. Deselect "show live community" box


source: http://community.intuit.com/posts/stop-have-a-question-when-opening-quickbooks#

Sunday, September 23, 2012

Protector.exe Removal


Automated removal:
It is critically important to remove Protector.exe, yet there might be a number of other threats to deal with. Without a doubt, presence of one infection on your PC increases the odds of having more than one threat, other things being equal, for every infection definitely weakens computer system.
The tool to get rid of Protector.exe takes the above consideration into account as it detects the infections through entire hard and removable memory submitted in order that it can delete the specified parasites. It is a multi-purpose solution to satisfy the variety of your computer protection needs. In the meantime, its ability to perform the extermination of rogue in question has been tested specifically, and empirical evidence available that it does cope with the task.
Protector.exe manual removal instructions:
Incorrect or incomplete deletion happens when one or more constituents of deleted rogue are omitted and/or harmless files and registry values are abolished instead. Such improper act rather harms than cures. If you stand for the manual procedure and is about to apply it, please completely delete the rogue in a strict accordance with the list below.
Remove Protector.exe files:
%AppData%\Inspector-[rnd].exe
%AppData%\Protector-[rnd].exe
Remove Protector.exe registry entries:
HKEY_LOCAL_MACHINE\SOFTWARE\Microsoft\Internet Explorer\Main\FeatureControl\FEATURE_ERROR_PAGE_BYPASS_ZONE_CHECK_FOR_HTTPS_KB954312
HKEY_CURRENT_USER\Software\Microsoft\Windows\CurrentVersion\Internet Settings “WarnOnHTTPSToHTTPRedirect” = 0
HKEY_CURRENT_USER\Software\Microsoft\Windows\CurrentVersion\Policies\System “DisableRegedit” = 0
HKEY_CURRENT_USER\Software\Microsoft\Windows\CurrentVersion\Policies\System “DisableRegistryTools” = 0
HKEY_CURRENT_USER\Software\Microsoft\Windows\CurrentVersion\Policies\System “DisableTaskMgr” = 0
HKEY_CURRENT_USER\Software\Microsoft\Windows\CurrentVersion\Run “Inspector”
HKEY_CURRENT_USER\Software\Microsoft\Windows\CurrentVersion\Settings “ID” = 0
HKEY_CURRENT_USER\Software\Microsoft\Windows\CurrentVersion\Settings “net” = “2012-2-17_2?
HKEY_CURRENT_USER\Software\Microsoft\Windows\CurrentVersion\Settings “UID” = “rudbxijemb”
HKEY_LOCAL_MACHINE\SOFTWARE\Microsoft\Windows NT\CurrentVersion\Image File Execution Options\_avp32.exe
HKEY_LOCAL_MACHINE\SOFTWARE\Microsoft\Windows NT\CurrentVersion\Image File Execution Options\_avpcc.exe
HKEY_LOCAL_MACHINE\SOFTWARE\Microsoft\Windows NT\CurrentVersion\Image File Execution Options\ashDisp.exe
HKEY_LOCAL_MACHINE\SOFTWARE\Microsoft\Windows NT\CurrentVersion\Image File Execution Options\divx.exe
HKEY_LOCAL_MACHINE\SOFTWARE\Microsoft\Windows NT\CurrentVersion\Image File Execution Options\mostat.exe
HKEY_LOCAL_MACHINE\SOFTWARE\Microsoft\Windows NT\CurrentVersion\Image File Execution Options\platin.exe
HKEY_LOCAL_MACHINE\SOFTWARE\Microsoft\Windows NT\CurrentVersion\Image File Execution Options\tapinstall.exe
HKEY_LOCAL_MACHINE\SOFTWARE\Microsoft\Windows NT\CurrentVersion\Image File Execution Options\zapsetup3001.exe

source: http://removers.volyn.net/2012/07/05/remove-protector-exe-as-a-main-executable-of-rogue-antispyware-products/

unHide the entire C: drive

un-hide the entire C: drive

1. Open CMD as admin

2. type: cd c:\

3. press Enter

4. type: attrib -r -h /s /d

5. press enter and wait for it to finish

Friday, September 21, 2012

Microsoft Word - Enabling Macro

This also fixes the following

Error Message: "the macros in this project are disabled. please refer to the online help or documentation of the host application to determine how to enable macros."


  1. Click the File tab.
  2. Click Options.
  3. Click Trust Center, and then click Trust Center Settings.
  4. In the Trust Center, click Macro Settings.
  5. Make the selections that you want.
  6. Click OK.
The following image is the Macro Settings area of the Trust Center.
Macro Settings area of Trust Center


Microsoft Word - error message: "word coul not creat the work file. Check the temp environment variable."

error message: "word coul not creat the work file. Check the temp environment variable."

Use the Microsoft Fix it Tool located here

This will reset user options and registry settings for Word.


Source: http://support.microsoft.com/kb/822005

Wednesday, September 19, 2012

Error code 643 and 0x80070643 - during windows update

Follow the instructions on the link below:

http://support.microsoft.com/kb/976982

----------------------

For .NET Framework uninstall and  .NET Framework 4 install,

see "Microsoft Software" links above!


Removed printer but still shows in available printers list

1. Run

2. CMD

3. net stop spooler

4. del %systemroot%\system32\spool\printers\*.shd

5. del %systemroot%\system32\spool\printers\*.spl

6. net start spooler

7. Close CMD

Tuesday, September 18, 2012

Google Chrome - Creating a new browser user profile


This can fix issues with your Google Chrome opening certain websites

Creating a new browser user profile:
  1. Exit Google Chrome completely.
  2. Go to the Start menu > Run.
  3. Enter one of the following directories in the text field, then press OK.
    • Windows XP: %USERPROFILE%\Local Settings\Application Data\Google\Chrome\User Data\
    • Windows Vista/ Windows 7: %LOCALAPPDATA%\Google\Chrome\User Data\
  4. Locate the folder called "Default" in the directory window that opens and rename it as "Backup default."
  5. Try opening Google Chrome again. A new "Default" folder is automatically created as you start using the browser.

To transfer bookmarks (favorites) :
  1. Close Chrome
  2. Go to "backup default" folder and copy the "Bookmarks.bak"
    • Windows XP: %USERPROFILE%\Local Settings\Application Data\Google\Chrome\User Data\
    • Windows Vista/ Windows 7:  %LOCALAPPDATA%\Google\Chrome\User Data\
  3. Delete "bookmarks" from the "default" folder
  4. Paste "bookmarks.bak" into the "default" folder
  5. Rename "bookmarks.bak" to "bookmarks"
  6. Open Chrome and your bookmarks should be there again

* You will need to reconfigure your homepage and settings for Chrome


Sunday, September 16, 2012

Error 8024A000 - Windows Update


Windows Updates Error Code 8024A000 solution below: -
Troubleshooting steps by steps for Windows updates error code 8024A000

Stopping services pertaining to Windows Update

Click Start, click All Programs, click Accessories, right-click Command Prompt, and select Run as Administrator.

If you receive a notification from User Account Control simply click Continue.
At the command prompt, type the following, commands and then press ENTER after each command.

net stop wuauserv
net stop bits
net stop cryptsvc

Please do not close the Command Prompt window.

Renaming folders pertaining to Windows Update

At the command prompt, type the following commands, and then press Enter after each command:

ren %systemroot%System32Catroot2 Catroot2.old
ren %systemroot%SoftwareDistribution SoftwareDistribution.old

Please do not close the Command Prompt window.

Now run batch file from here or create manually batch or run manually all the below commands.

regsvr32 c:windowssystem32vbscript.dll /s
regsvr32 c:windowssystem32mshtml.dll /s
regsvr32 c:windowssystem32msjava.dll /s
regsvr32 c:windowssystem32jscript.dll /s
regsvr32 c:windowssystem32msxml.dll /s
regsvr32 c:windowssystem32actxprxy.dll /s
regsvr32 c:windowssystem32shdocvw.dll /s
regsvr32 wuapi.dll /s
regsvr32 wuaueng1.dll /s
regsvr32 wuaueng.dll /s
regsvr32 wucltui.dll /s
regsvr32 wups2.dll /s
regsvr32 wups.dll /s
regsvr32 wuweb.dll /s
regsvr32 Softpub.dll /s
regsvr32 Mssip32.dll /s
regsvr32 Initpki.dll /s
regsvr32 softpub.dll /s
regsvr32 wintrust.dll /s
regsvr32 initpki.dll /s
regsvr32 dssenh.dll /s
regsvr32 rsaenh.dll /s
regsvr32 gpkcsp.dll /s
regsvr32 sccbase.dll /s
regsvr32 slbcsp.dll /s
regsvr32 cryptdlg.dll /s
regsvr32 Urlmon.dll /s
regsvr32 Shdocvw.dll /s
regsvr32 Msjava.dll /s
regsvr32 Actxprxy.dll /s
regsvr32 Oleaut32.dll /s
regsvr32 Mshtml.dll /s
regsvr32 msxml.dll /s
regsvr32 msxml2.dll /s
regsvr32 msxml3.dll /s
regsvr32 Browseui.dll /s
regsvr32 shell32.dll /s
regsvr32 wuapi.dll /s
regsvr32 wuaueng.dll /s
regsvr32 wuaueng1.dll /s
regsvr32 wucltui.dll /s
regsvr32 wups.dll /s
regsvr32 wuweb.dll /s
regsvr32 jscript.dll /s
regsvr32 atl.dll /s
regsvr32 Mssip32.dll /s

Now after that, start all the below services.

net start wuauserv
net start bits
net start cryptsvc

And finally, now check your Windows Update


source: http://www.winlinhack.com/windows-updates-error-code-8024a000-solution-in-windows-7.html

Wednesday, September 12, 2012

Spooler .reg files - replace corrupted registry files (spooler error or can't start)

Use this with the Printer .reg file (post located here)

This fixes the following error messages, it might fix other errors but it has fixed these errors from my experience.

error message: "windows can't open add printer. the local print spooler service is not running. Please restart the spooler or restart the machine.";
error message: "spooler subsystem app stopped working and was closed";


----------------------------------------

1. Create text file

2. Copy items below

3. Rename to "spooler.reg" without quotes

4. Open registry > file > import file

5. Reboot PC

Items to be copied bellow:


Windows Registry Editor Version 5.00

[HKEY_LOCAL_MACHINE\SYSTEM\CurrentControlSet\Services\Spooler]
"DependOnService"=hex(7):52,00,50,00,43,00,53,00,53,00,00,00,00,00
"Description"="Loads files to memory for later printing."
"DisplayName"="Print Spooler"
"ErrorControl"=dword:00000001
"FailureActions"=hex:80,51,01,00,00,00,00,00,00,00,00,00,03,00,00,00,e8,47,0c,\
  00,01,00,00,00,60,ea,00,00,01,00,00,00,60,ea,00,00,00,00,00,00,00,00,00,00
"Group"="SpoolerGroup"
"ImagePath"=hex(2):25,00,53,00,79,00,73,00,74,00,65,00,6d,00,52,00,6f,00,6f,00,\
  74,00,25,00,5c,00,73,00,79,00,73,00,74,00,65,00,6d,00,33,00,32,00,5c,00,73,\
  00,70,00,6f,00,6f,00,6c,00,73,00,76,00,2e,00,65,00,78,00,65,00,00,00
"ObjectName"="LocalSystem"
"Start"=dword:00000002
"Type"=dword:00000110

[HKEY_LOCAL_MACHINE\SYSTEM\CurrentControlSet\Services\Spooler\Parameters]

[HKEY_LOCAL_MACHINE\SYSTEM\CurrentControlSet\Services\Spooler\Performance]
"Close"="PerfClose"
"Collect"="PerfCollect"
"Collect Timeout"=dword:000007d0
"Library"="winspool.drv"
"Object List"="1450"
"Open"="PerfOpen"
"Open Timeout"=dword:00000fa0
"WbemAdapFileSignature"=hex:bd,83,ab,a6,1e,8a,cc,c8,d9,ff,b8,69,f2,94,18,ce
"WbemAdapFileTime"=hex:00,a0,a1,10,27,9e,c8,01
"WbemAdapFileSize"=dword:00023c00
"WbemAdapStatus"=dword:00000000

[HKEY_LOCAL_MACHINE\SYSTEM\CurrentControlSet\Services\Spooler\Security]
"Security"=hex:01,00,14,80,78,00,00,00,84,00,00,00,14,00,00,00,30,00,00,00,02,\
  00,1c,00,01,00,00,00,02,80,14,00,ff,01,0f,00,01,01,00,00,00,00,00,01,00,00,\
  00,00,02,00,48,00,03,00,00,00,00,00,14,00,8d,01,02,00,01,01,00,00,00,00,00,\
  05,0b,00,00,00,00,00,18,00,ff,01,0f,00,01,02,00,00,00,00,00,05,20,00,00,00,\
  20,02,00,00,00,00,14,00,fd,01,02,00,01,01,00,00,00,00,00,05,12,00,00,00,01,\
  01,00,00,00,00,00,05,12,00,00,00,01,01,00,00,00,00,00,05,12,00,00,00

[HKEY_LOCAL_MACHINE\SYSTEM\CurrentControlSet\Services\Spooler\Enum]
"0"="Root\\LEGACY_SPOOLER\\0000"
"Count"=dword:00000001
"NextInstance"=dword:00000001

[HKEY_LOCAL_MACHINE\SYSTEM\ControlSet001\Services\Spooler]
"DependOnService"=hex(7):52,00,50,00,43,00,53,00,53,00,00,00,00,00
"Description"="Loads files to memory for later printing."
"DisplayName"="Print Spooler"
"ErrorControl"=dword:00000001
"FailureActions"=hex:80,51,01,00,00,00,00,00,00,00,00,00,03,00,00,00,e8,47,0c,\
  00,01,00,00,00,60,ea,00,00,01,00,00,00,60,ea,00,00,00,00,00,00,00,00,00,00
"Group"="SpoolerGroup"
"ImagePath"=hex(2):25,00,53,00,79,00,73,00,74,00,65,00,6d,00,52,00,6f,00,6f,00,\
  74,00,25,00,5c,00,73,00,79,00,73,00,74,00,65,00,6d,00,33,00,32,00,5c,00,73,\
  00,70,00,6f,00,6f,00,6c,00,73,00,76,00,2e,00,65,00,78,00,65,00,00,00
"ObjectName"="LocalSystem"
"Start"=dword:00000002
"Type"=dword:00000110

[HKEY_LOCAL_MACHINE\SYSTEM\ControlSet001\Services\Spooler\Parameters]

[HKEY_LOCAL_MACHINE\SYSTEM\ControlSet001\Services\Spooler\Performance]
"Close"="PerfClose"
"Collect"="PerfCollect"
"Collect Timeout"=dword:000007d0
"Library"="winspool.drv"
"Object List"="1450"
"Open"="PerfOpen"
"Open Timeout"=dword:00000fa0
"WbemAdapFileSignature"=hex:bd,83,ab,a6,1e,8a,cc,c8,d9,ff,b8,69,f2,94,18,ce
"WbemAdapFileTime"=hex:00,a0,a1,10,27,9e,c8,01
"WbemAdapFileSize"=dword:00023c00
"WbemAdapStatus"=dword:00000000

[HKEY_LOCAL_MACHINE\SYSTEM\ControlSet001\Services\Spooler\Security]
"Security"=hex:01,00,14,80,78,00,00,00,84,00,00,00,14,00,00,00,30,00,00,00,02,\
  00,1c,00,01,00,00,00,02,80,14,00,ff,01,0f,00,01,01,00,00,00,00,00,01,00,00,\
  00,00,02,00,48,00,03,00,00,00,00,00,14,00,8d,01,02,00,01,01,00,00,00,00,00,\
  05,0b,00,00,00,00,00,18,00,ff,01,0f,00,01,02,00,00,00,00,00,05,20,00,00,00,\
  20,02,00,00,00,00,14,00,fd,01,02,00,01,01,00,00,00,00,00,05,12,00,00,00,01,\
  01,00,00,00,00,00,05,12,00,00,00,01,01,00,00,00,00,00,05,12,00,00,00
[HKEY_LOCAL_MACHINE\SYSTEM\ControlSet001\Services\Spooler\Enum]
"0"="Root\\LEGACY_SPOOLER\\0000"
"Count"=dword:00000001
"NextInstance"=dword:00000001

[HKEY_LOCAL_MACHINE\SYSTEM\ControlSet002\Services\Spooler]
"DependOnService"=hex(7):52,00,50,00,43,00,53,00,53,00,00,00,00,00
"Description"="Loads files to memory for later printing."
"DisplayName"="Print Spooler"
"ErrorControl"=dword:00000001
"FailureActions"=hex:80,51,01,00,00,00,00,00,00,00,00,00,03,00,00,00,e8,47,0c,\
  00,01,00,00,00,60,ea,00,00,01,00,00,00,60,ea,00,00,00,00,00,00,00,00,00,00
"Group"="SpoolerGroup"
"ImagePath"=hex(2):25,00,53,00,79,00,73,00,74,00,65,00,6d,00,52,00,6f,00,6f,00,\
  74,00,25,00,5c,00,73,00,79,00,73,00,74,00,65,00,6d,00,33,00,32,00,5c,00,73,\
  00,70,00,6f,00,6f,00,6c,00,73,00,76,00,2e,00,65,00,78,00,65,00,00,00
"ObjectName"="LocalSystem"
"Start"=dword:00000002
"Type"=dword:00000110

[HKEY_LOCAL_MACHINE\SYSTEM\ControlSet002\Services\Spooler\Parameters]

[HKEY_LOCAL_MACHINE\SYSTEM\ControlSet002\Services\Spooler\Performance]
"Close"="PerfClose"
"Collect"="PerfCollect"
"Collect Timeout"=dword:000007d0
"Library"="winspool.drv"
"Object List"="1450"
"Open"="PerfOpen"
"Open Timeout"=dword:00000fa0
"WbemAdapFileSignature"=hex:bd,83,ab,a6,1e,8a,cc,c8,d9,ff,b8,69,f2,94,18,ce
"WbemAdapFileTime"=hex:00,a0,a1,10,27,9e,c8,01
"WbemAdapFileSize"=dword:00023c00
"WbemAdapStatus"=dword:00000000

[HKEY_LOCAL_MACHINE\SYSTEM\ControlSet002\Services\Spooler\Security]
"Security"=hex:01,00,14,80,78,00,00,00,84,00,00,00,14,00,00,00,30,00,00,00,02,\
  00,1c,00,01,00,00,00,02,80,14,00,ff,01,0f,00,01,01,00,00,00,00,00,01,00,00,\
  00,00,02,00,48,00,03,00,00,00,00,00,14,00,8d,01,02,00,01,01,00,00,00,00,00,\
  05,0b,00,00,00,00,00,18,00,ff,01,0f,00,01,02,00,00,00,00,00,05,20,00,00,00,\
  20,02,00,00,00,00,14,00,fd,01,02,00,01,01,00,00,00,00,00,05,12,00,00,00,01,\
  01,00,00,00,00,00,05,12,00,00,00,01,01,00,00,00,00,00,05,12,00,00,00
[HKEY_LOCAL_MACHINE\SYSTEM\ControlSet003\Services\Spooler]
"DependOnService"=hex(7):52,00,50,00,43,00,53,00,53,00,00,00,00,00
"Description"="Loads files to memory for later printing."
"DisplayName"="Print Spooler"
"ErrorControl"=dword:00000001
"FailureActions"=hex:80,51,01,00,00,00,00,00,00,00,00,00,03,00,00,00,e8,47,0c,\
  00,01,00,00,00,60,ea,00,00,01,00,00,00,60,ea,00,00,00,00,00,00,00,00,00,00
"Group"="SpoolerGroup"
"ImagePath"=hex(2):25,00,53,00,79,00,73,00,74,00,65,00,6d,00,52,00,6f,00,6f,00,\
  74,00,25,00,5c,00,73,00,79,00,73,00,74,00,65,00,6d,00,33,00,32,00,5c,00,73,\
  00,70,00,6f,00,6f,00,6c,00,73,00,76,00,2e,00,65,00,78,00,65,00,00,00
"ObjectName"="LocalSystem"
"Start"=dword:00000002
"Type"=dword:00000110

[HKEY_LOCAL_MACHINE\SYSTEM\ControlSet003\Services\Spooler\Parameters]

[HKEY_LOCAL_MACHINE\SYSTEM\ControlSet003\Services\Spooler\Performance]
"Close"="PerfClose"
"Collect"="PerfCollect"
"Collect Timeout"=dword:000007d0
"Library"="winspool.drv"
"Object List"="1450"
"Open"="PerfOpen"
"Open Timeout"=dword:00000fa0
"WbemAdapFileSignature"=hex:bd,83,ab,a6,1e,8a,cc,c8,d9,ff,b8,69,f2,94,18,ce
"WbemAdapFileTime"=hex:00,a0,a1,10,27,9e,c8,01
"WbemAdapFileSize"=dword:00023c00
"WbemAdapStatus"=dword:00000000

[HKEY_LOCAL_MACHINE\SYSTEM\ControlSet003\Services\Spooler\Security]
"Security"=hex:01,00,14,80,78,00,00,00,84,00,00,00,14,00,00,00,30,00,00,00,02,\
  00,1c,00,01,00,00,00,02,80,14,00,ff,01,0f,00,01,01,00,00,00,00,00,01,00,00,\
  00,00,02,00,48,00,03,00,00,00,00,00,14,00,8d,01,02,00,01,01,00,00,00,00,00,\
  05,0b,00,00,00,00,00,18,00,ff,01,0f,00,01,02,00,00,00,00,00,05,20,00,00,00,\
  20,02,00,00,00,00,14,00,fd,01,02,00,01,01,00,00,00,00,00,05,12,00,00,00,01,\
  01,00,00,00,00,00,05,12,00,00,00,01,01,00,00,00,00,00,05,12,00,00,00


Printer .reg files - replace corrupted registry files

Used this fix together with the spooler fix, it might fix other error.

For spooler fix click here

-----------------------------------------------

1. Create text file

2. Copy items bellow

3. Rename to "printer.reg" without quotes

4. Open registry > file > import file

5. Reboot PC

Items to be copied bellow: 


Windows Registry Editor Version 5.00

[HKEY_LOCAL_MACHINE\SYSTEM\ControlSet002\Control\Print]
"MajorVersion"=dword:00000002
"MinorVersion"=dword:00000000
"PriorityClass"=dword:00000000
"RemoveMXDW"=dword:00000000
"BeepEnabled"=dword:00000000
"PortThreadPriority"=dword:00000000
"SchedulerThreadPriority"=dword:00000000
"GMTAdjustedForDST"=dword:00000001

[HKEY_LOCAL_MACHINE\SYSTEM\ControlSet002\Control\Print\Environments]

[-HKEY_LOCAL_MACHINE\SYSTEM\ControlSet002\Control\Print\Environments\Windows NT x86\Drivers]

[HKEY_LOCAL_MACHINE\SYSTEM\ControlSet002\Control\Print\Environments\Windows NT x86\Drivers]

[-HKEY_LOCAL_MACHINE\SYSTEM\CurrentControlSet\Control\Print\Environments\Windows NT x86\Drivers]

[HKEY_LOCAL_MACHINE\SYSTEM\CurrentControlSet\Control\Print\Environments\Windows NT x86\Drivers]

[HKEY_LOCAL_MACHINE\SYSTEM\ControlSet002\Control\Print\Environments\Windows NT x86\Drivers\Version-3]
"Directory"="3"
"MajorVersion"=dword:00000003
"MinorVersion"=dword:00000000

[-HKEY_LOCAL_MACHINE\SYSTEM\ControlSet002\Control\Print\Environments\Windows NT x86\Print Processors]

[HKEY_LOCAL_MACHINE\SYSTEM\ControlSet002\Control\Print\Environments\Windows NT x86\Print Processors]

[-HKEY_LOCAL_MACHINE\SYSTEM\CurrentControlSet\Control\Print\Environments\Windows NT x86\Print Processors]

[HKEY_LOCAL_MACHINE\SYSTEM\CurrentControlSet\Control\Print\Environments\Windows NT x86\Print Processors]

[HKEY_LOCAL_MACHINE\SYSTEM\ControlSet002\Control\Print\Environments\Windows NT x86\Print Processors\winprint]
"Driver"="localspl.dll"

[HKEY_LOCAL_MACHINE\SYSTEM\ControlSet002\Control\Print\Environments\Windows x64]
"Directory"="x64"

[-HKEY_LOCAL_MACHINE\SYSTEM\ControlSet002\Control\Print\Environments\Windows x64\Drivers]

[HKEY_LOCAL_MACHINE\SYSTEM\ControlSet002\Control\Print\Environments\Windows x64\Drivers]

[-HKEY_LOCAL_MACHINE\SYSTEM\CurrentControlSet\Control\Print\Environments\Windows x64\Drivers]

[HKEY_LOCAL_MACHINE\SYSTEM\CurrentControlSet\Control\Print\Environments\Windows x64\Drivers]

[-HKEY_LOCAL_MACHINE\SYSTEM\ControlSet002\Control\Print\Environments\Windows x64\Print Processors]

[HKEY_LOCAL_MACHINE\SYSTEM\ControlSet002\Control\Print\Environments\Windows x64\Print Processors]

[-HKEY_LOCAL_MACHINE\SYSTEM\CurrentControlSet\Control\Print\Environments\Windows x64\Print Processors]

[HKEY_LOCAL_MACHINE\SYSTEM\CurrentControlSet\Control\Print\Environments\Windows x64\Print Processors]

[-HKEY_LOCAL_MACHINE\SYSTEM\ControlSet003\Control\Print\Monitors]

[HKEY_LOCAL_MACHINE\SYSTEM\ControlSet003\Control\Print\Monitors]

[HKEY_LOCAL_MACHINE\SYSTEM\ControlSet003\Control\Print\Monitors\Local Port]
"Driver"="localspl.dll"

[HKEY_LOCAL_MACHINE\SYSTEM\ControlSet003\Control\Print\Monitors\Standard TCP/IP Port]
"Driver"="tcpmon.dll"

[HKEY_LOCAL_MACHINE\SYSTEM\ControlSet003\Control\Print\Monitors\Standard TCP/IP Port\Ports]
"StatusUpdateInterval"=dword:0000000a
"StatusUpdateEnabled"=dword:00000001
"LprAckTimeout"=dword:000000b4

[HKEY_LOCAL_MACHINE\SYSTEM\ControlSet003\Control\Print\Monitors\USB Monitor]
"Driver"="usbmon.dll"

[HKEY_LOCAL_MACHINE\SYSTEM\ControlSet003\Control\Print\Monitors\WSD Port]
"Driver"="WSDMon.dll"

[-HKEY_LOCAL_MACHINE\SYSTEM\ControlSet002\Control\Print\Monitors]

[HKEY_LOCAL_MACHINE\SYSTEM\ControlSet002\Control\Print\Monitors]

[-HKEY_LOCAL_MACHINE\SYSTEM\CurrentControlSet\Control\Print\Monitors]

[HKEY_LOCAL_MACHINE\SYSTEM\CurrentControlSet\Control\Print\Monitors]

[HKEY_LOCAL_MACHINE\SYSTEM\ControlSet002\Control\Print\Monitors\Local Port]
"Driver"="localspl.dll"

[HKEY_LOCAL_MACHINE\SYSTEM\ControlSet002\Control\Print\Monitors\Standard TCP/IP Port]
"Driver"="tcpmon.dll"

[HKEY_LOCAL_MACHINE\SYSTEM\ControlSet002\Control\Print\Monitors\Standard TCP/IP Port\Ports]
"StatusUpdateInterval"=dword:0000000a
"StatusUpdateEnabled"=dword:00000001
"LprAckTimeout"=dword:000000b4

[HKEY_LOCAL_MACHINE\SYSTEM\ControlSet002\Control\Print\Monitors\USB Monitor]
"Driver"="usbmon.dll"

[HKEY_LOCAL_MACHINE\SYSTEM\ControlSet002\Control\Print\Monitors\WSD Port]
"Driver"="WSDMon.dll"

[HKEY_LOCAL_MACHINE\SYSTEM\CurrentControlSet\Control\Print\Monitors\Local Port]
"Driver"="localspl.dll"

[HKEY_LOCAL_MACHINE\SYSTEM\CurrentControlSet\Control\Print\Monitors\Standard TCP/IP Port]
"Driver"="tcpmon.dll"

[HKEY_LOCAL_MACHINE\SYSTEM\CurrentControlSet\Control\Print\Monitors\Standard TCP/IP Port\Ports]
"StatusUpdateInterval"=dword:0000000a
"StatusUpdateEnabled"=dword:00000001
"LprAckTimeout"=dword:000000b4

[HKEY_LOCAL_MACHINE\SYSTEM\CurrentControlSet\Control\Print\Monitors\USB Monitor]
"Driver"="usbmon.dll"

[HKEY_LOCAL_MACHINE\SYSTEM\CurrentControlSet\Control\Print\Monitors\WSD Port]
"Driver"="WSDMon.dll"

[-HKEY_LOCAL_MACHINE\SYSTEM\CurrentControlSet\Control\Print\Printers]

[HKEY_LOCAL_MACHINE\SYSTEM\CurrentControlSet\Control\Print\Printers]
"DefaultSpoolDirectory"="C:\\WINDOWS\\System32\\spool\\PRINTERS"

[-HKEY_LOCAL_MACHINE\SYSTEM\ControlSet002\Control\Print\Printers]

[HKEY_LOCAL_MACHINE\SYSTEM\ControlSet002\Control\Print\Printers]
"DefaultSpoolDirectory"="C:\\WINDOWS\\System32\\spool\\PRINTERS"


Tuesday, September 11, 2012

How to enable or disable software rendering in Internet Explorer 9

Automatic:

Enable hardware acceleration - click here

Disable hardware acceleration - click here


Manually:

To disable hardware acceleration, follow these steps: 
  1. Click Start, and then click Internet Explorer.
  2. Click the Tools icon in the upper-right corner, and then click Internet Options.
  3. Click the Advanced tab, and then under Accelerated graphics, select the Use software rendering instead of GPU rendering check box.

  4. Click Apply, and then click OK.
  5. Close Internet Explorer 9 and then restart it so that the change takes effect. 
To enable hardware acceleration again, follow the previous steps, but in step 3, clear the Use software rendering instead of GPU rendering check box. 

Source: http://support.microsoft.com/kb/2528233

Monday, September 10, 2012

Outlook Error when deleting emails: "the messaging interface has returned an unkown error. if the problem persists, restart outlook"


After each step see if the problem has been fixed, if not go to second step.

1. Empty the Deleted Items Folder

If you have a large number of messages in a Microsoft Exchange Server mailbox and you cannot delete them, empty your deleted items folder to resolve this problem. To do this:
  1. On the View menu, click Folder List.
  2. Right-click Deleted Items, and then click Empty Deleted Items Folder.

2. Use the Inbox Repair Tool

  1. Close Outlook.
  2. Click Start, point to Settings, and then click Control Panel.
  3. Double-click Mail and Fax. (If you do not have the fax service installed, double-click Mail.)
  4. On the Services tab, click Personal Folders, click Properties (make note of the information that is in the Path box), and then click OK.
  5. Click Start, point to Programs, point to Accessories, point to System Tools, and then click Inbox Repair Tool.
  6. In the Drives box, type the path of your Personal Folders file that you noted in step 4, click Start, and then clickOK after the scan is complete.
  7. Start Outlook and check for new message, send a fax, or create a new Calendar item.
If this does not resolve the problem, continue with the following steps.

3. Create a New Personal Folders (.pst) File

  1. Close Outlook.
  2. Click Start, point to Settings, and then click Control Panel.
  3. Double-click Mail and Fax. (If you do not have the fax service installed, double-click Mail.)
  4. On the Services tab, click Personal Folders, click Properties (make note of the information that is in the Path box), and then click OK.
  5. On the Services tab, click Personal Folders, and then click Remove.
  6. Click Add, click Personal Folders in the Available information services box, and then click OK.
  7. In File name box, type your first name. For example, if your name is Bob, type Bob, click Open, click OK twice, and then exit Control Panel.
  8. Start Outlook and check for new messages, send a fax, or create a new Calendar item.
If this resolves the problem, you can import your information that is stored in your original Personal Folders (.pst) file. 

Use the following steps to import your information:
  1. On the File menu, click Import and Export.
  2. In the Choose an action to perform box, click Import from a personal folder file (.pst), and then click Next.
  3. In the File to import box, type the path of your Personal Folders (.pst) file, and then click Next.
  4. Verify that Personal Folders is selected as the folder to import from and the folder to import into, and then clickFinish.
If this does not resolve the problem, continue with the following steps.

4. Create a New Profile

  1. On the File menu, click Exit and Log Off.
  2. Click Start, point to Settings, and then click Control Panel.
  3. Double-click Mail and Fax. (If you do not have the fax service installed, double-click Mail.)
  4. Click Show Profiles, and then click Add.
  5. Click to select the services you use, click Next, and then complete the information for each of the services when you receive the prompt from the Inbox Setup Wizard.
  6. When you receive the prompt for the path to your Personal Folder (.pst) file, click before the "M" (without quotation marks) of the Mailbox.pst file, type new, and then click Next.

    NOTE: Verify that the path information is not selected before you type new.
  7. Complete the steps in the Inbox Setup Wizard.
  8. On the General tab, click the name of the profile that you created in the When starting Microsoft Windows Messaging, use this profile box, and then click Close.
  9. Start Outlook and check for new messages, send a fax, or create a new Calendar item.


Sunday, September 9, 2012

Hotmail website left justified and not looking properly

1. Go to this link:

https://snt133.mail.live.com/mail/HttpsLogin.aspx?rru=home&livecom=1&mc=4

2. Sign in if it asks you to

3. Click on "always use HTTPS"


If that doesn't fix it do the following


1. Reset Internet Explorer settings

2. Uninstall/Re-install Flash player

    a) For Internet Explorer click here

     b) For other Browsers (plug in) click here

3. Uninstall/Re-install Java click here

4. Reboot PC

Error -6000, -80: An error occurred when QuickBooks tried to access the company file


Why this is happening
How to fix it