.bat files to reset and fix windows 7 update issues found at:
http://www.sevenforums.com/tutorials/91738-windows-update-reset.html
PC Tune-up
RootKit & Sirefef
- GS | Kaspersky - TDSS Killer
- GS | Kaspersky - ZBotKiller
- GS | Norton - FixTDSS
- GS | Webroot - Rootkit Remover | 32-bit
- ESET - ZeroAccess (Sirefef) rootkit
- McAfee - Rootkit Remover
- Panda - Removes Trj/Sirefef & Rootkit/Zaccess
- Trend Micro - Rootki-buster | 32-bit
- Windows Sysinternals - Rootkit Revealer v1.71
- aswMBR - Tutorial
- aswMBR - Rootkit scanner | 32-bit
Tools
- Ninite Updater
- Speed Test
- Blue Screen Log Viewer
- DNS Changer Check-up
- File association fixes | Windows 7
- File association fixes | Windows Vista
- File association fixes | windows XP
- GS | 7-Zip
- HP Printer Diagnostic Tool
- Internet Explorer - Repair
- Internet Explorer - Registry Fix
- inSSIDer - Wi-Fi Discovery Tool
- PDF rider (merge 2 pdf files)
- Process Library
- Send Fax | online document to fax #
- Sysinternals Suite
- Sysinternals Utilities Index
- Websites UP and Down Status
- Wireless Key Viewer | 32-bit
- Wireless Key Viewer | 64-bit
- WinRar | 32-bit
- .edb File Reader 1 (exports contacts from .edb file)
- .edb File Reader 2 (exports contacts from .edb file)
Microsoft Software
- ---Microsoft Security Essentials---
- AirPort Utility 5.5.3 for Windows
- EMET - Enhanced Mitigation Experience Toolkit v2.1
- GS | .NET Framework - Uninstaller
- GS | .NET Framework 4 - Installer
- Microsoft Silver Light
- Microsoft Silver Light Tester
- Microsoft Works File Converter
- MS Office 2010 Download (product key needed)
- MS Office 2013 & 365 Download (product key needed)
- MS Office 2010 Trial
- MS Office 2010 Product Key for Windows (pin needed)
- MS Office Online File Converters and Viewers
- MS Publisher 2010 (trial used as viewer after expires)
- Open Office - Apache
- Open Office - PDF Import Extension
- Power Point Viewer 2007
- WiFi Profile Manager | Win 8
- Windows 7 Compatibility Center
- Windows Live Essentials
Microsoft "Fix it" Tools
- "Fix it" Solution Center
- Look up an Error Message
- Audio
- DVD drive missing or not recognized
- Error opening hyperlink in Outlook
- Firewall
- Fix broken shortcuts
- Fix Trash Can if deleted from desktop
- Printer problems
- problems when you install or uninstall software
- Reset IE Settings Fix
- Reset Internet Protocol (TCP/IP)
- Reset windows update components
- Update
- Win XP - Reset the registry and the file permissions
Sunday, July 29, 2012
Wednesday, July 25, 2012
How to Turn Off HP SimplePass FingerPrint Reader
Turn off Biometric Logins:
Remove the biometric login option:
1 . Control Panel > Biometric Devices > Change Biometric Settings
2. UNCHECK "Allow users to log on to Windows using their fingerprints"
Save the changes.
------ OR-------
2. To remove Biometrics data for all users, click the radio (round) button "Biometrics off"
Disable the Validity Sensor Driver:
The Validity Sensor Driver controls the fingerprinter hardware.
The SimplePass software controls the password database.
You can disable the device. The fingerprinter will no long work as long as the device remains disabled.
1. Control Panel > Device Manager > Biometric Devices
2. Right-Click on Validity Sensor > Disable
2. Right-Click on Validity Sensor > Disable
Tuesday, July 24, 2012
Changing setting for automatic send/receive time in outlook
To change automatic send/receive time in outlook (tested in 2007 and 2010)
- Open outlook
- Press Ctrl+Alt+S
- Change time for the setting "schedule an automatic send/receive every"
- click close
Friday, July 20, 2012
Windows Firewall will not start, error code 5
Personal note: check for viruses first. Most likely viruses is what caused this problem to start with
When you attempt to start the Windows 7 firewall service you receive the following error
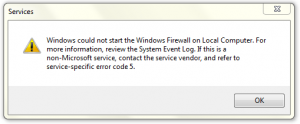
Windows could not start the Windows Firewall on Local Computer. For more information, review the system event log. If this is a non-Microsoft service, contact the service vendor, and refer to service-specific error code 5.
If you look in the System Event Log, you will see event 7024 from the Service Control Manager
The Windows Firewall service terminated with service-specific error Access is denied..
Cause
This may be caused because the “NT Service\MpsSvc” account does not have adequate permissions on the following registry key
HKLM\SYSTEM\CurrentControlSet\Services\SharedAccess
Solution
- In Registry Editor, browse to the key HKLM\SYSTEM\CurrentControlSet\Services\SharedAccess
- Right click SharedAccess, and click Permissions.
- Click Add.
- In the “Enter the object names to select” field, type “NT SERVICE\mpssvc”. Then click CheckNames. The name should change to MpsSvc
- Click OK.
- Select Full Control in the Allow column.
- Click OK.
Applies To
Windows 7 (all versions) / Windows Vista (all versions)
Reset security permission for entire Windows OS
Cmd command:
secedit /configure /cfg %windir%\inf\defltbase.inf /db defltbase.sdb /verbose
secedit /configure /cfg %windir%\inf\defltbase.inf /db defltbase.sdb /verbose
Thursday, July 19, 2012
Error applying security - when changing permission to a folder OR can't open a folder
Error applying security can happen if you are trying to change permission to a folder due to you not being able to open that folder.
- Right click > properties > security tab > advanced > edit
- select your user account name
- Check the box for "replace owner on subcontainers and objects"
- Click OK to all
Now you should be able to open up that folder
Friday, July 13, 2012
Fatal Error during HP printer driver & software installation
First end all updating task using "task manager" (example: toolbars, java, flash)
Re-install the driver & software
If the fatal error still continue go to this link
http://h10025.www1.hp.com/ewfrf/wc/document?docname=c02455020&lc=en&cc=us&dlc=en&product=3919449#N2022
Select your operating system and follow the steps
Re-install the driver & software
If the fatal error still continue go to this link
http://h10025.www1.hp.com/ewfrf/wc/document?docname=c02455020&lc=en&cc=us&dlc=en&product=3919449#N2022
Select your operating system and follow the steps
Zero Access - Trojan Sirefef
This is for windows 7 and Vista
**attention**
This virus can be hiding in different folders here is a link to another Sirefef removal:
http://www.mybloggo.com/how-i-removed-desktop-ini-virusmalware/#more-118
Arrival Details
This virus can be hiding in different folders here is a link to another Sirefef removal:
http://www.mybloggo.com/how-i-removed-desktop-ini-virusmalware/#more-118
Arrival Details
This Trojan arrives on a system as a file dropped by other malware or as a file downloaded unknowingly by users when visiting malicious sites.
Installation
This Trojan creates the following folders: FIND and DELETE
- %Application Data%\{082f346d-1afd-ef95-7a41-5848b36bed23}
- %Application Data%\{082f346d-1afd-ef95-7a41-5848b36bed23}\U
- %Application Data%\{082f346d-1afd-ef95-7a41-5848b36bed23}\L
- %Windows%\Installers\{082f346d-1afd-ef95-7a41-5848b36bed23}
- %Windows%\Installers\{082f346d-1afd-ef95-7a41-5848b36bed23}\U
- %Windows%\Installers\{082f346d-1afd-ef95-7a41-5848b36bed23}\L
(Note: %Application Data% is the current user's Application Data folder, which is usually C:\Windows\Profiles\{user name}\Application Data on Windows 98 and ME, C:\WINNT\Profiles\{user name}\Application Data on Windows NT, and C:\Documents and Settings\{user name}\Local Settings\Application Data on Windows 2000, XP, and Server 2003.. %Windows% is the Windows folder, which is usually C:\Windows or C:\WINNT.)
Other System Modifications
This Trojan modifies the following registry entries:
HKEY_LOCAL_MACHINE\SOFTWARE\Classes\
CLSID\{F3130CDB-AA52-4C3A-AB32-85FFC23AF9C1}\InprocServer32
@ = "\.\globalroot\systemroot\Installer\{082f346d-1afd-ef95-7a41-5848b36bed23}\n."
CLSID\{F3130CDB-AA52-4C3A-AB32-85FFC23AF9C1}\InprocServer32
@ = "\.\globalroot\systemroot\Installer\{082f346d-1afd-ef95-7a41-5848b36bed23}\n."
Note: The default value data for (default) entry is %System%\wbem\wbemess.dll
Note: The default value data threadingModel is "Both"
Note: The default value data threadingModel is "Both"
-------------------------------------------------------------------------------------------------------
HKEY_CLASSES_ROOT\CLSID\{42aedc87-2188-41fd-b9a3-0c966feabec1}\
InProcServer32
@ = "%Application Data%\{082f346d-1afd-ef95-7a41-5848b36bed23}\n."
InProcServer32
@ = "%Application Data%\{082f346d-1afd-ef95-7a41-5848b36bed23}\n."
Note: The default value data for (default) entry is %System%\system32\shell32.dll
Note: The default value data threadingModel is "Apartment"
Dropping Routine
This Trojan drops the following files: FIND and DELETE
- %Application Data%\{082f346d-1afd-ef95-7a41-5848b36bed23}\@
- %Application Data%\{082f346d-1afd-ef95-7a41-5848b36bed23}\n
- %Windows%\Installer\{082f346d-1afd-ef95-7a41-5848b36bed23}\@
- %Windows%\Installer\{082f346d-1afd-ef95-7a41-5848b36bed23}\n
- %Windows%\Installer\{082f346d-1afd-ef95-7a41-5848b36bed23}\U\00000001.@
- %Windows%\Installer\{082f346d-1afd-ef95-7a41-5848b36bed23}\U\80000000.@
- %Windows%\Installer\{082f346d-1afd-ef95-7a41-5848b36bed23}\U\800000cb.@
(Note: %Application Data% is the current user's Application Data folder, which is usually C:\Windows\Profiles\{user name}\Application Data on Windows 98 and ME, C:\WINNT\Profiles\{user name}\Application Data on Windows NT, and C:\Documents and Settings\{user name}\Local Settings\Application Data on Windows 2000, XP, and Server 2003.. %Windows% is the Windows folder, which is usually C:\Windows or C:\WINNT.)
Wednesday, July 11, 2012
Trend Micro Office Scan Client asking password to uninstall
Trend Micro Office Scan Client will ask for a password to allow the uninstall to continue.
Most likely you will not know what the password is, so here are two methods:
Method 1: Change registry at Regedit.exe
HKLM\Software\Trendmicro\PC-Cillinntcorp\CurrentVersion\Misc.\Allow Uninstall
Change from 0 to 1
* If you are not being allowed to change the registry due to self protection do method 2
Method 2: Go to folder:
C:\Program files\Trend Micro\"Office Scan Client"\OFCSCAN.ini
a. Open the file OFCSCAN.ini with notepad
b. Search (press Ctrl+F) for "Uninstall_Pwd" or "UninstallPwd" (depends on your version)
c. Change password to:
!CRYPT!523D617DF57CBF0E9ACD37611537EBB612F9B6F1C471EB529B89772E71AD9D2431BC212ACF23B7767831E317364
d. Save file and close file and folder
e. The new password for the uninstall will be "test"
Monday, July 9, 2012
HP printer can't connect to wireless network due to "No Filtering - Fail"
Check your router wireless settings for:
- SSID is set to broadcast
- DHCP is active
- MAC filtering is disabled
- Change the router wireless channel to 11
FBI Moneypak virus removal
=======Manual Removal From experience=======
Main file location for the FBI virus:
C:\Users\"user"\AppData\Roaming\Microsoft\Windows\Start Menu\Programs\Startup\"ctfmon.lnk" or "random"
C:\Users\"user"\AppData\Roaming\"random"
C:\Users\"user"\AppData\Local\"random"
C:\ProgramData\"random"
Names found for "random":
Registry key location:
HKEY_USERS\S-1-5-21-3167221968-1021630806-270161164-1000\Software\Microsoft\Windows\CurrentVersion\Run\"random"
You might need to use HijackThis to end the Isass.exe , then use task manager to kill it again.
After that delete files;
*This is from personal experience, file could be named differently or located somewhere else.
================Manual Removal #1==============
Normal Antivirus will not work, must remove the virus manually.
** If you don't know what you are doing, don't delete anything
Kill ROGUE_NAME Processes:
Main file location for the FBI virus:
C:\Users\"user"\AppData\Roaming\Microsoft\Windows\Start Menu\Programs\Startup\"ctfmon.lnk" or "random"
C:\Users\"user"\AppData\Roaming\"random"
C:\Users\"user"\AppData\Local\"random"
C:\ProgramData\"random"
Names found for "random":
- Isass.exe
- yaaiwpoep.exe
- zuoby.exe
- ifgxpers.exe
Registry key location:
HKEY_USERS\S-1-5-21-3167221968-1021630806-270161164-1000\Software\Microsoft\Windows\CurrentVersion\Run\"random"
You might need to use HijackThis to end the Isass.exe , then use task manager to kill it again.
After that delete files;
*This is from personal experience, file could be named differently or located somewhere else.
================Manual Removal #1==============
Normal Antivirus will not work, must remove the virus manually.
** If you don't know what you are doing, don't delete anything
- Re-boot PC in Safe Mode with Networking
- Start Task Manager (Ctrl+Alt+Del)
- Find and stop the process for the scam malware virus
- Open Run
- Type regedit.exe
- Find and delete the following registry entries:
- HKEY_CLASSES_ROOT\personalSS.DocHostUIHandler
- HKEY_CURRENT_USER\Software\Microsoft\Internet Explorer\Download "RunInvalidSignatures" = "1"
- HKEY_CURRENT_USER\Software\Microsoft\Windows\CurrentVersion\Insternet
- Remove malicious files from the following folders:
- C:\Users\"user name"\appdata\"random"\
- C:\Users\"user name"\appdata\"random"\"random".exe
- C:\Users\"user name"\appdata\"random"\"random".mof
- check also the other folders inside appdata for any random names
Youtube tutorials:
- http://www.youtube.com/watch?v=_gILhDFqm4I
- http://www.youtube.com/watch?v=VYjKMA9gprM&feature=player_embedded#!
================Manual Removal #2==============
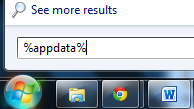
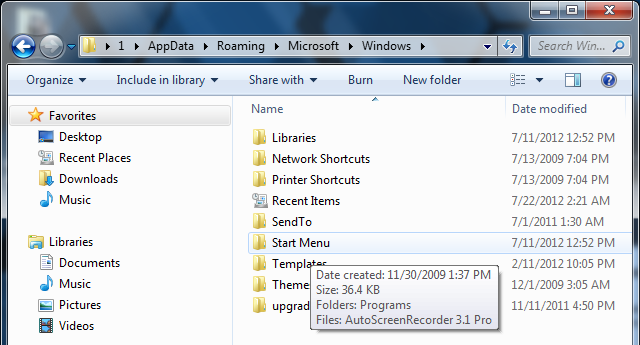
1. Open Windows Start Menu and type %appdata% into the search field, press Enter.

2. Navigate to: Microsoft\Windows\Start Menu\Programs\Startup

3. Remove ctfmon (ctfmon.lnk if in dos) – this is what’s calling the virus on start up. This is not ctfmon.exe.

2. Navigate to: Microsoft\Windows\Start Menu\Programs\Startup

3. Remove ctfmon (ctfmon.lnk if in dos) – this is what’s calling the virus on start up. This is not ctfmon.exe.
4. Open Windows Start Menu and type %userprofile% into the search field and press enter.

5. Navigate to: Appdata\Local\Temp
6. Remove rool0_pk.exe

7.Remove [random].mof file
8. Remove V.class

5. Navigate to: Appdata\Local\Temp
6. Remove rool0_pk.exe

7.Remove [random].mof file
8. Remove V.class
The virus can have names other than “rool0_pk.exe” but it should appear similar, there may also be 2 files, 1 being a .mof. Removing the .exe file will fix FBI Moneypak. The class file uses a java vulnerability to install the virus, removal of V.class is done for safe measure.
All FBI Moneypak Files:
The files listed above are what causes FBI Moneypak to function. To ensure FBI Moneypak is completely removed via manually, please delete all given files. Keep in mind, [random] can be any sequence of numbers or letters.
- %Program Files%\FBI Moneypak Virus
- %AppData%\Protector-[rnd].exe
- %AppData%\Inspector-[rnd].exe
- %AppData%\vsdsrv32.exe
- %AppData%\result.db
- %AppData%\jork_0_typ_col.exe
- %appdata%\[random].exe
- %Windows%\system32\[random].exe
- %Documents and Settings%\[UserName]\Application Data\[random].exe
- %Documents and Settings%\[UserName]\Desktop\[random].lnk
- %Documents and Settings%\All Users\Application Data\FBI Moneypak Virus
- %CommonStartMenu%\Programs\FBI Moneypak Virus.lnk
- %Temp%\0_0u_l.exe
- %Temp%\[RANDOM].exe
- %StartupFolder%\wpbt0.dll
- %StartupFolder%\ctfmon.lnk
- %StartupFolder%\ch810.exe
- %UserProfile%\Desktop\FBI Moneypak Virus.lnk
- WARNING.txt
- V.class
- cconf.txt.enc
- tpl_0_c.exe
Access Windows Task Manager (Ctrl+Alt+Delete) and kill the rogue FBI Moneypak process. Please note the infection will have a random name for the process [random] which may contain a sequence of numbers and letters (ie: USYHEY347H372.exe).
[random].exe
Remove Registry Values
To access Window’s Registry Editor type regedit into the Windows Start Menu text field and press Enter.


- HKEY_CURRENT_USER\SOFTWARE\Microsoft\Windows\CurrentVersion\Run\[random].exe
- HKEY_LOCAL_MACHINE\SOFTWARE\FBI Moneypak Virus
- HKEY_CURRENT_USER \Software\Microsoft\Windows\CurrentVersion\Policies\System ‘DisableRegistryTools’ = 0
- HKEY_LOCAL_MACHINE \SOFTWARE\Microsoft\Windows\CurrentVersion\policies\system ‘EnableLUA’ = 0
- HKEY_CURRENT_USER \Software\Microsoft\Windows\CurrentVersion\Internet Settings ‘WarnOnHTTPSToHTTPRedirect’ = 0
- HKEY_CURRENT_USER \Software\Microsoft\Windows\CurrentVersion\Policies\System ‘DisableRegedit’= 0
- HKEY_CURRENT_USER\Software\FBI Moneypak Virus
- HKEY_CURRENT_USER\Software\Microsoft\Windows\CurrentVersion\Run ‘Inspector’
- HKEY_LOCAL_MACHINE\SOFTWARE\Microsoft\Windows\CurrentVersion\Uninstall\FBI Moneypak Virus
- HKEY_CURRENT_USER \Software\Microsoft\Windows\CurrentVersion\Policies\System ‘DisableTaskMgr’ = 0
- HKEY_LOCAL_MACHINE\SOFTWARE\Microsoft\Windows NT\CurrentVersion\Image File Execution Options\protector.exe
- HKEY_CURRENT_USER\Software\Microsoft\Windows\CurrentVersion\Run\Inspector %AppData%\Protector-[rnd].exe
- HKEY_CURRENT_USER\Software\Microsoft\Windows\CurrentVersion\Internet Settings\WarnOnHTTPSToHTTPRedirect 0
- HKEY_CURRENT_USER\Software\Microsoft\Windows\CurrentVersion\Settings\ID 4
- HKEY_CURRENT_USER\Software\Microsoft\Windows\CurrentVersion\Settings\UID [rnd]
- HKEY_CURRENT_USER\Software\Microsoft\Windows\CurrentVersion\Settings\net [date of installation]
- HKEY_LOCAL_MACHINE\SOFTWARE\Microsoft\Windows\CurrentVersion\policies\system\ConsentPromptBehaviorAdmin 0
- HKEY_LOCAL_MACHINE\SOFTWARE\Microsoft\Windows\CurrentVersion\policies\system\ConsentPromptBehaviorUser 0
- HKEY_LOCAL_MACHINE\SOFTWARE\Microsoft\Windows\CurrentVersion\policies\system\EnableLUA 0
- HKEY_LOCAL_MACHINE\SOFTWARE\Microsoft\Windows NT\CurrentVersion\Image File Execution Options\AAWTray.exe
- HKEY_LOCAL_MACHINE\SOFTWARE\Microsoft\Windows NT\CurrentVersion\Image File Execution Options\AAWTray.exe\Debugger svchost.exe
- HKEY_LOCAL_MACHINE\SOFTWARE\Microsoft\Windows NT\CurrentVersion\Image File Execution Options\AVCare.exe
- HKEY_LOCAL_MACHINE\SOFTWARE\Microsoft\Windows NT\CurrentVersion\Image File Execution Options\AVCare.exe\Debugger svchost.exe
- HKEY_LOCAL_MACHINE\SOFTWARE\Microsoft\Windows NT\CurrentVersion\Image File Execution Options\AVENGINE.EXE
- HKEY_LOCAL_MACHINE\SOFTWARE\Microsoft\Windows NT\CurrentVersion\Image File Execution Options\AVENGINE.EXE\Debugger svchost.exe
- HKEY_CURRENT_USER\Software\Microsoft\Windows\CurrentVersion\Policies\System “DisableRegistryTools” = 0
- HKEY_CURRENT_USER\Software\Microsoft\Windows\CurrentVersion\Policies\System “DisableTaskMgr” = 0
- HKEY_LOCAL_MACHINE\SOFTWARE\Microsoft\Windows\CurrentVersion\policies\system “ConsentPromptBehaviorAdmin” = 0
- HKEY_LOCAL_MACHINE\SOFTWARE\Microsoft\Windows\CurrentVersion\policies\system “ConsentPromptBehaviorUser” = 0
- HKEY_LOCAL_MACHINE\SOFTWARE\Microsoft\Windows\CurrentVersion\policies\system “EnableLUA” = 0
sources:
Sunday, July 8, 2012
Computer running slow due to wmpnetwk.exe or wmpnscfg.exe
wmpnetwk.exe is the main exe for Windows Media Player Network Sharing Service.
I have seen it take up over 90% of the physical memory.
The easiest way to disabled it is:
- Open Run
- Type Services.msc
- Locate windows media player network sharing service
- right click and select properties
- click on stop
- select start-up type as Disabled or Manual
- press OK
User Disapeared at Log on Screen
- Select Run from start menu or "Win logo+R"
- Type: control userpasswords2
- Click OK
- In the box that appears, there should be a check box that says "Users must enter a user name and password to use this computer." If this box is not checked off, you can check it off and then save your changes by clicking the "OK" button.
You can Also try the following:
- try holding down the Shift key on your keyboard when your computer is booting up to force the login screen to appear. **But this is temporary and will only work for that single logon.
2. try typing in the Run box the following command: rundll32 netplwiz.dll,ClearAutoLogon
Wednesday, July 4, 2012
New Toshiba All-in-One PC - wireless mouse and keyboard not working
For the the wireless mouse and keyboard to work, you must first install the RF USB dongle.
Procedure to install the RF USB dongle:
Procedure to install the RF USB dongle:
1. While looking at the back of the computer, remove the cover using your index finger.


2.Insert RF USB dongle and lift up until it is firmly connected.


3. Replace the cover.
If the USB keyboard or mouse do not work, verify the batteries are installed corretly.
Subscribe to:
Posts (Atom)

